
TLC Community Credit Union 

Close right-side column
Select a Category
Your Life/Manage/FAQ
Bill Pay - Online Banking FAQ
The following frequently asked questions are for using Bill Pay in Online Banking. For frequently asked questions about using Bill Pay in the TLC Mobile Banking App visit the Bill Pay - Mobile Banking FAQ page.
Bill Pay Options available in Online Banking
1. What is Bill Pay?
Bill Pay is a service that allows you to pay virtually anyone or any company through your Online or Mobile Banking account. TLC partners with a company called iPay for this service.
With Bill Pay you determine who you want to pay, when you want to make the payment and which account you want the payment to come from. It's safe, secure and easy to use. You can pay virtually any business or individual with a mailing address within the United States and Puerto Rico. For example, you can pay utilities, cable bills or credit cards, or individuals such as a landlord, babysitter or relative.
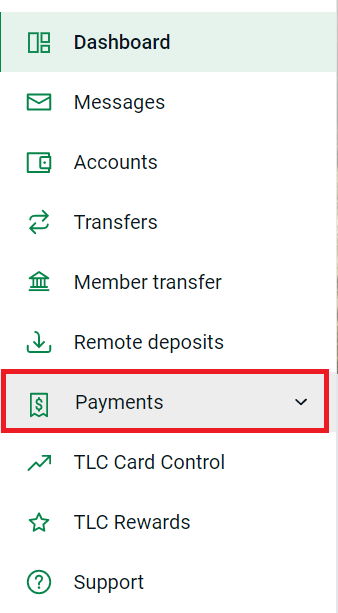
2. How do I access Bill Pay?
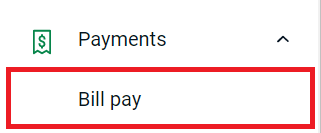
Login to Online Banking from TLC’s home page at www.tlccu.org. Once you’ve logged in, click on "Payments" in the sidebar menu.
Then click on "Bill Pay."
This takes you to the Bill Pay Screen. This screen offers the Quick Methods of Bill Pay.
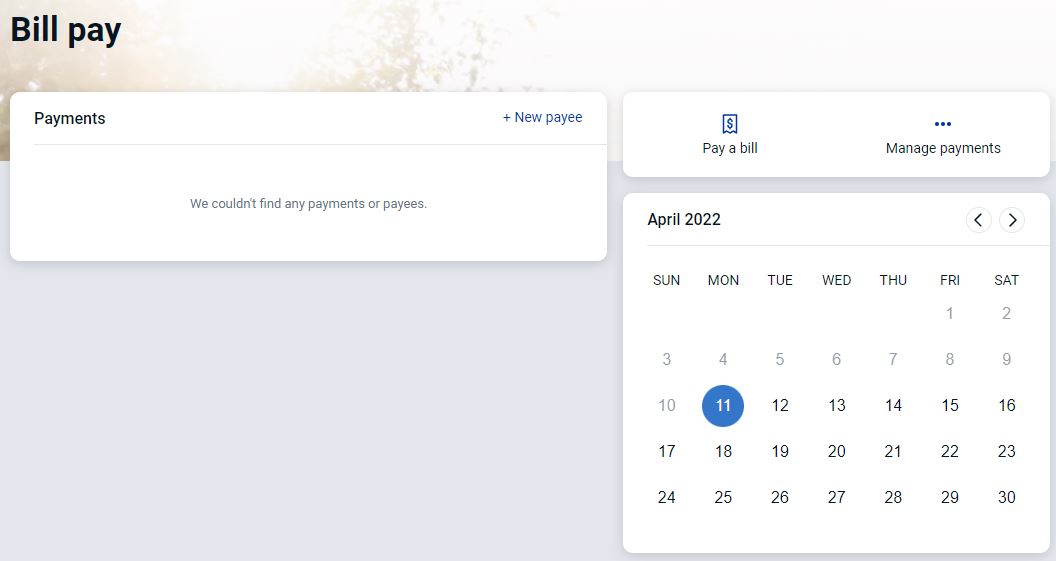
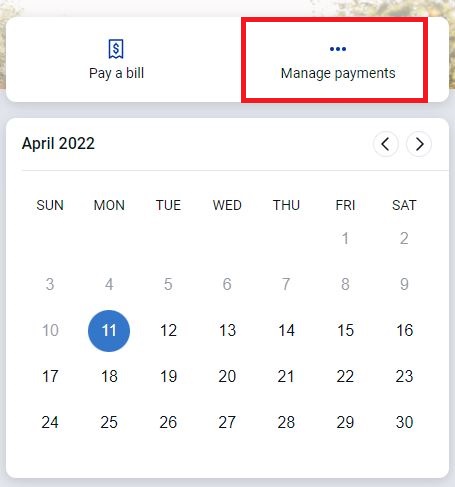
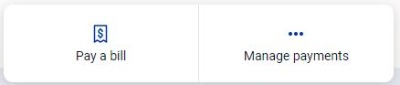
For an in depth look at bill pay, and more options, click on "Manage Payments" on the right side of the screen. Manage Payments will take you to the full Bill Pay site.
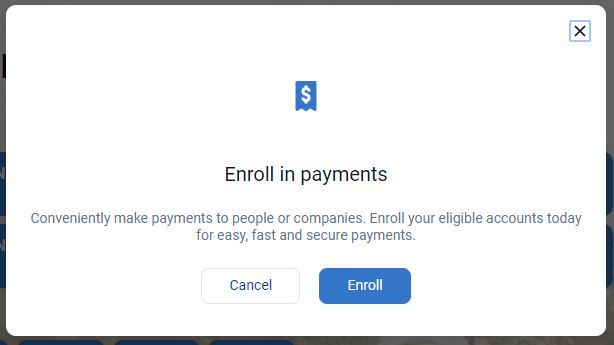
3. Do I need to enroll in Bill Pay?
Simply Log in to Online Banking and click on "Bill Pay" in the sidebar menu. On your first visit you will be asked to enroll. An enrollment screen will be displayed with a link to the Bill Pay Terms and Conditions. Once you agree to the Terms and Conditions, you can begin adding payees and making payments immediately.
4. How is my bill payment processed?
Payments are processed either electronically or by check. Electronic payments will be processed through either ACH or by Virtual Card. Check payments are mailed via the U.S. Postal Service. The goal is to deliver your payment securely, using the fastest method available for your payee.
How a payee receives payment, electronic or check, is determined by the payee. We cannot force a payment to go electronically if a payee has not established that relationship with our bill pay provider.
To see how your payment is being sent click on "Payments" in the sidebar menu.
To see how your payment is being sent click on "Payments" in the sidebar menu.
Then click on "Bill Pay."
Find the desired payment in your activity list, then click on it to open the payment details. You will see how it's being delivered, when it will send and when the estimated arrival* is.

*Checks are sent thought the traditional US mail so all arrival dates are estimates and are subject to mail times. Electronic payments can be delivered as soon as the next day if it is scheduled before 2pm.
5. When is my account debited?
If your payment was sent electronically, your account is debited at approximately 10:00 AM on the estimated delivery/payment date. If your payment was sent via check, your account is debited after the recipient cashes your check payment, just like a check you would write out yourself.
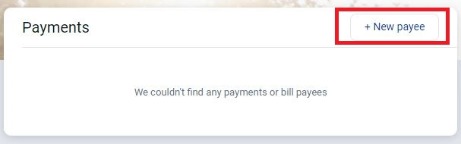
6. How do I add a PAYEE?
There are two ways you can add a PAYEE, the "Quick Method" and the "Detailed Method." Both methods are shown below.
Adding Payee - Quick Method:
Click on "Payments" in the sidebar menu.
Then click on "Bill Pay."
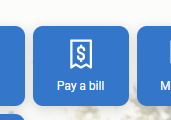
Click "+New Payee" from the middle of the screen.
On the "Add another bill" page enter all of the information for the payee (company) you are adding. We suggest using the information* on your latest bill/statement.
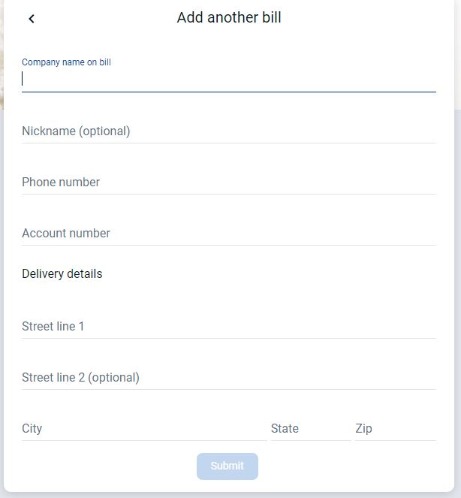
*All of the information on this page pertains to the company other than account number, that is your account number with the company. The address is where you would mail a payment.
Adding Payee - Detailed Method:
Click on "Payments" in the sidebar menu.
Then click on "Bill Pay."
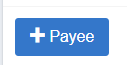
Click "Manage Payments" from the right side of the screen.
Click the blue "+Payee" button. If this is your first time using Bill Pay you will see a "Welcome to your Bill Pay" pop-up, click "Continue."
In the "Search Payee" box start typing the payee (company) name you are adding. If an electronic relationship has been established between the payee (company) and our bill pay provider it will pop-up as an option as your typing. You can click on the intended payee and click "Add."
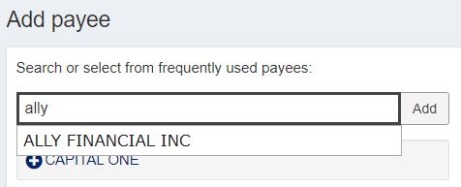
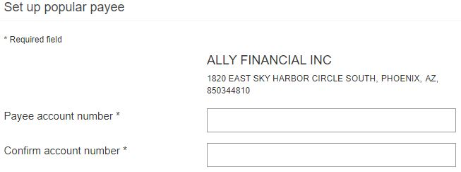
The next page will already be filled out with the companies information as reported by them to our bill pay provider. You will only be able to add your account number.
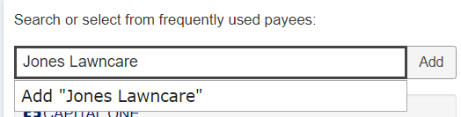
If what you're typing is not recognized by our bill pay provider, you will see an option to "Add" that payee.
The next page will ask for the account number, and your payee's Zip code.
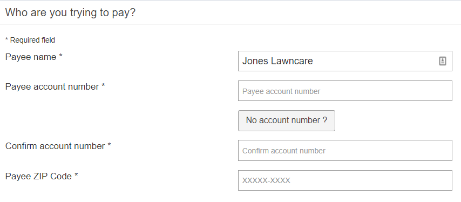
Enter the rest of the information for the payee on the next page.
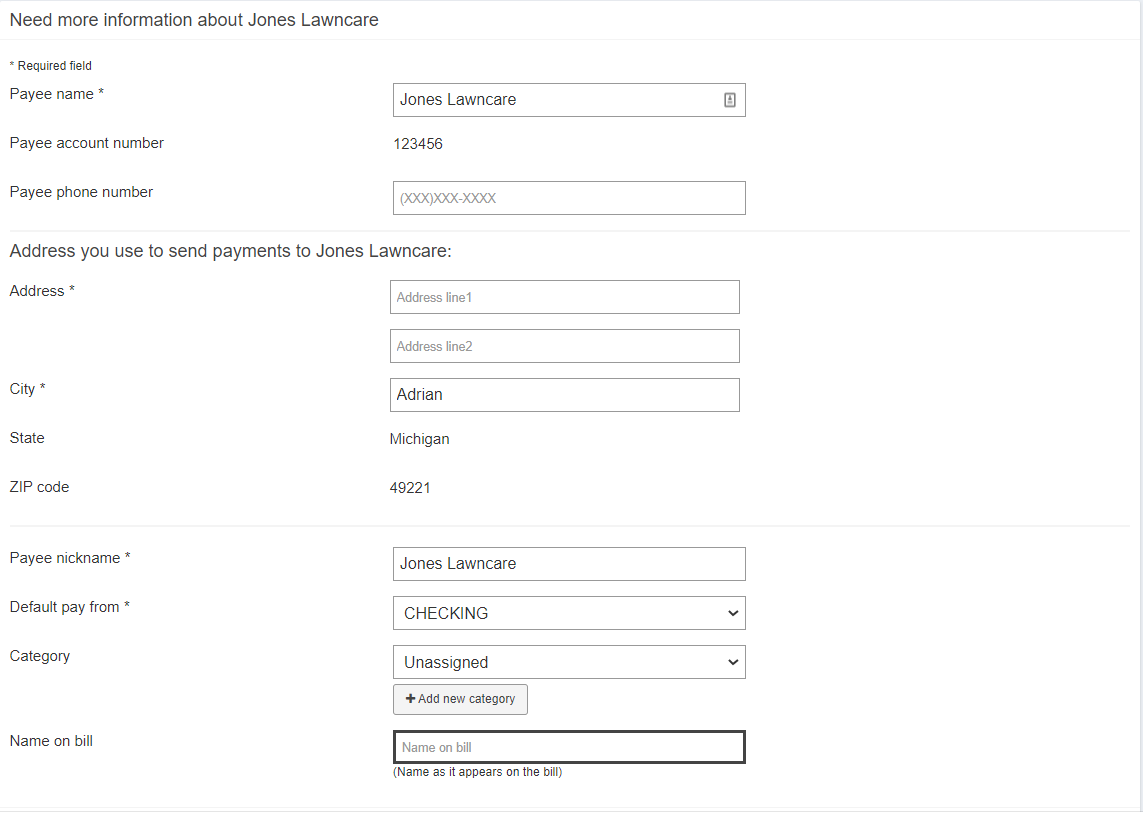
The next button will turn dark blue and become clickable when all of the required fields are completed. Click next and the payee is added. You will be taken back to the Payments page but you should see your newly created payee on your list.
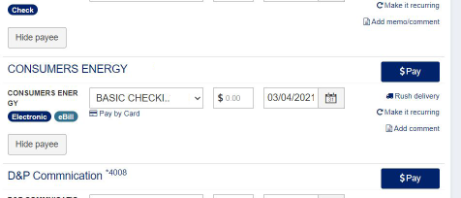
7. How do I schedule a single payment?
There are two ways you can schedule a single payment, the "Quick Method" and the "Detailed Method." Both methods are shown below.
Schedule a Single Payment - Quick Method
To quickly schedule a single payment you can either click on "Payments" in the sidebar menu.
Then click on "Bill Pay."
Then click "Pay a bill" OR click "Pay a Bill" right on the dashboard.
OR
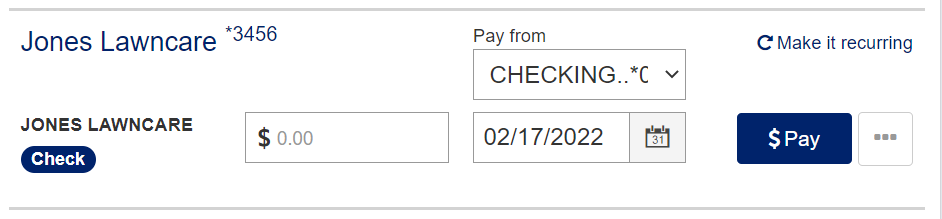
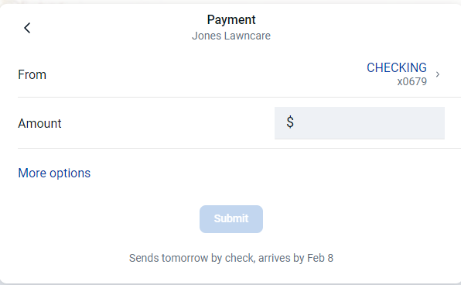
Click on the payee you'd like to schedule a payment for.
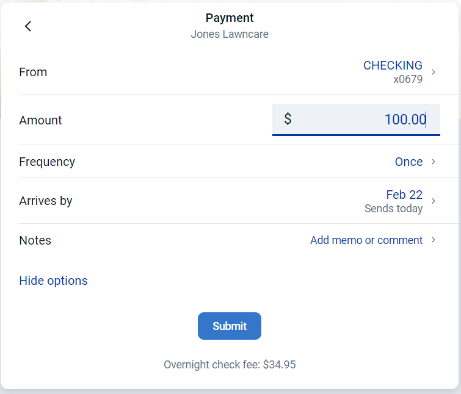
Select the account you would like to pay FROM (if different than the default), enter the amount you are paying.

Use "More Options" button to change the frequency of the payment, the estimated arrives by date, and add a note. Under the submit button it will tell you how that is being sent (electronically or via check), and the estimated arrival date.
When all of the required fields are completed the "Submit" button will turn dark blue and become clickable. Click "Submit" to finalize your payment.
Schedule a Single Payment - Detailed Method
Click on "Payments" in the sidebar menu.
Then click on "Bill Pay."
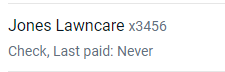
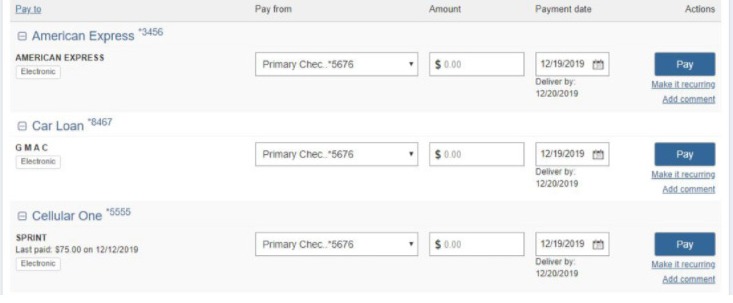
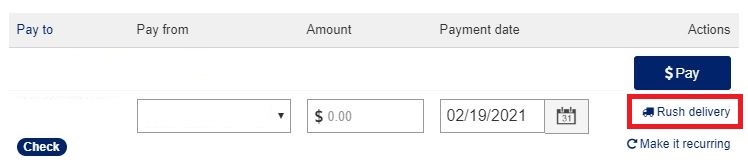
Find the payee you'd like to schedule a payment for on your "Pay to" list. Select the account you would like to pay FROM (if different than the default), enter the amount you are paying.
Tap the three dots to add a "Comment" if it's an electronic payment, or a "Memo and/or Comment" if it is being paid via check.

From here you can also select if you'd like this payment rushed to the payee or click the "Make it recurring button" to change the frequency of the payment. By clicking the "Make it recurring" button you can set the payment to be paid automatically for you based on your desired schedule.
Once you have completed that, simply hit the blue "$Pay" button to schedule the payment. You will then see the payment on the "Pending" list.
8. How do I schedule payments to multiple payee's?
Click on "Payments" in the sidebar menu.
Then click on "Bill Pay."
Then click "Manage Payments."
You will see a list of all your linked payees. You can then add the dollar amount you are paying to each payee and change the delivery by date if needed. When you're finished you can click "Pay all" and they will be scheduled.
9. How do I edit or delete a PAYEE?
There are two ways you can edit a PAYEE, the "Quick Method" and the "Detailed Method." Both methods are shown below.
Edit Payee - Quick Method
Click on "Payments" in the sidebar menu.
Then click on "Bill Pay."
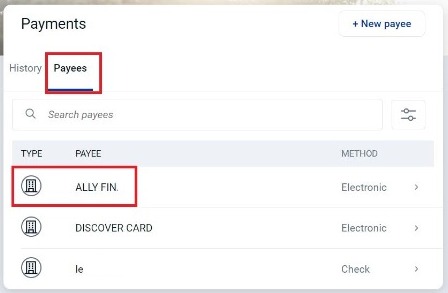
Click on "Payees" from the payment screen and then click on the payee you would like to edit.

On the Details page that opens you will see the information about the payee. Click on "Edit" to edit or delete the payee. You will be asked to enter your Online Banking password since you are making a change.
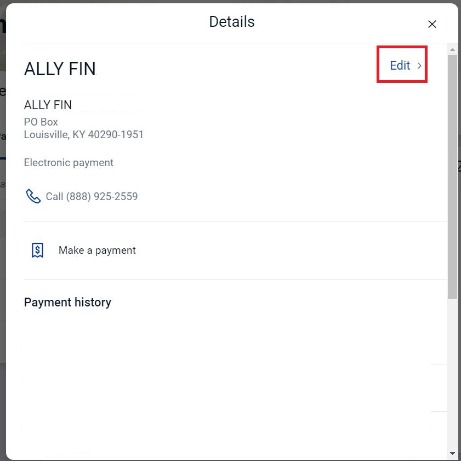
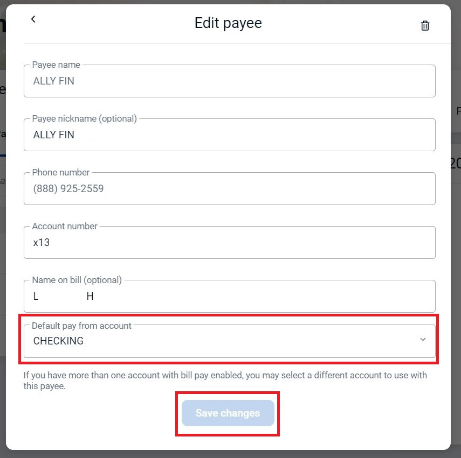
The next page will show you what you can edit about a payee.
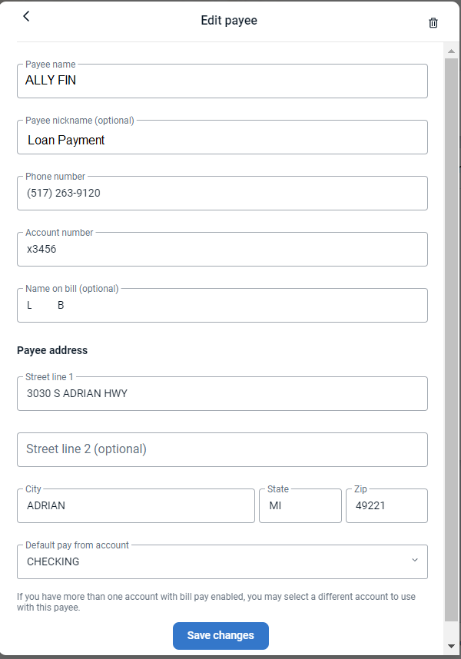
- If the payee is one that has an electronic relationship with our bill pay provider, you will only be able to edit the payee nickname, your account number and the account you would like this payment to default from.
- If it is one of your custom payee's you can edit everything except the Payee Name.
- Any of the information that is gray and will not let you click to edit you cannot change, anything that is darker black you can edit.
- To delete the Payee click the trash can in the top right corner.
Edit Payee - Detailed Method
Click on "Payments" in the sidebar menu.
Then click on "Bill Pay."
Then click "Manage Payments."
From your list of Payee's find the one you'd like to edit or delete and click on the Payees name.
Click "Edit payee."
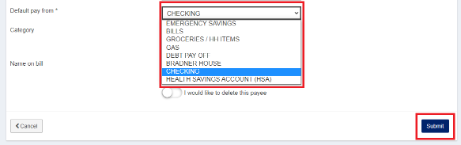
The next screen will allow you to edit any information you are able to for that payee, or toggle the "I would like to delete this payee" button to completely delete the payee.

10. How do I edit or delete a PAYMENT?
There are two ways you can edit a PAYMENT, the "Quick Method" and the "Detailed Method." Both methods are shown below.
Edit Payment - Quick Method
Click on "Payments" in the sidebar menu.
Then click on "Bill Pay."
Find the payment you'd like to stop from the "History" list. It will say "Scheduled."

Click on the payment and on the new screen click "Edit."
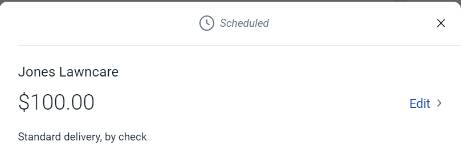
Click on the payment and on the new screen click "Edit."
The next screen will allow you to edit the fields you would like to change, or you can click the Trash Can to delete the payment completely.
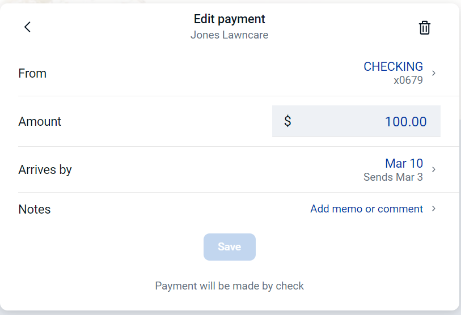
As long as your payment is pending, you will not be charged for a stop payment*.
Edit Payment - Detailed Method
Click on "Payments" in the sidebar menu.
Then click on "Bill Pay."
Then click "Manage Payments."
Find the payment in the "Pending" menu and click "Edit."

Edit the fields you wish to update or select "I would like to stop this payment" from this screen and then click "Submit." As long as your payment is pending, you will not be charged for a stop payment*.
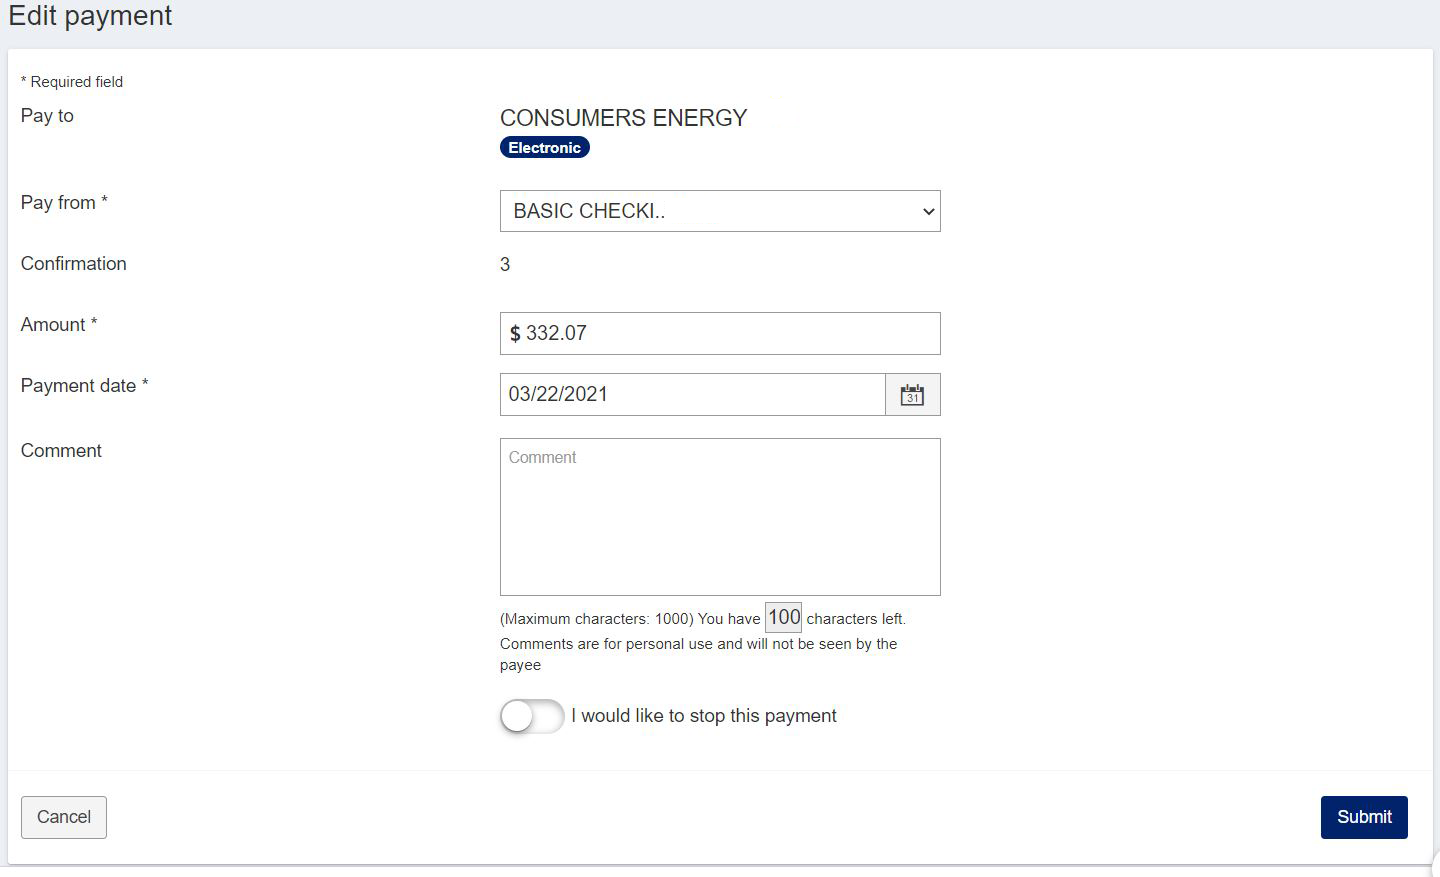
*You can pay for a stop payment if it is not listed as pending. Visit the Miscellaneous FAQ page for more details.
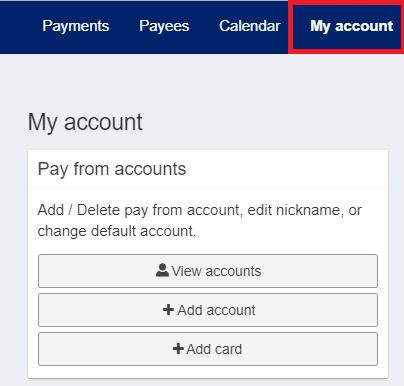
11. How do I change the default shares? (New Payees)
You can change the default share for NEW Payees in Bill Pay by logging into Online Banking (not available in Mobile Banking).
Click on "Payments" in the sidebar menu.
Then click on "Bill Pay."
Then click "Manage Payments."
Click on "My Account" and then click on "View Accounts"
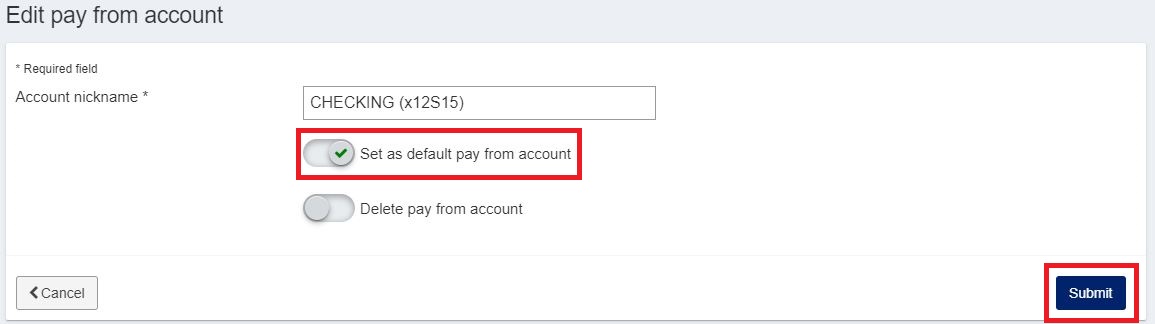
Select "Edit" on the share that you would like to make the default share.

Select "Set as default pay from account." Click on "Submit" to save your changes.
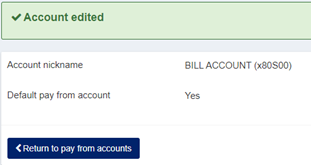
After you click submit you will get an "Account Edited" with a green check mark to confirm your changes.
12. How do I change the default shares? (Existing Payees)
There are two ways you can change the default shares for Existing Payees, the "Quick Method" and the "Detailed Method." Both methods are shown below.
Change Default Share for Existing Payees - Quick Method
Click on "Payments" in the sidebar menu.
Then click on "Bill Pay."
Click on "Payees" from the payment screen and then click on the payee you would like to edit.
On the Details page that opens you will see the information about the payee. Click on "Edit" to edit. You will be asked to enter your Online Banking password since you are making a change.
Select the default pay from account from the drop down and click on "Save Changes."
Change Default Share for Existing Payees - Detailed Method
Click on "Payments" in the sidebar menu.
Then click on "Bill Pay."
Then click "Manage Payments."
From your list of Payee's find the one you'd like to edit or delete and click on the Payees name.
Click "Edit payee."
Select the default pay from account from the drop down. Click on "Submit" to save your changes.
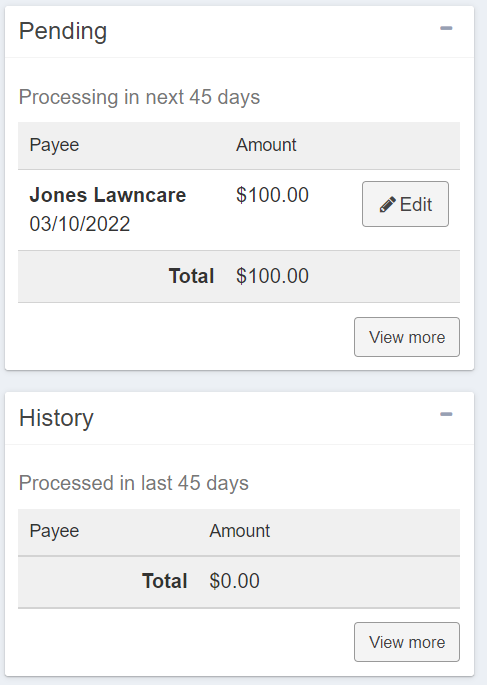
13. How can I see which payments are pending/paid?
There are two ways you can see which payments are pending/paid, the "Quick Method" and the "Detailed Method." Both methods are shown below.
When viewing pending/paid payments, keep in mind that check payments will move to History when a check has been sent in the mail, but will not reflect in your account until the payee has cashed the check.
View Payments Paid/Pending - Quick Method
Click on "Payments" in the sidebar menu.
Then click on "Bill Pay."
Any payment that has been scheduled will say "Scheduled" under the History list.

You will also see a dot on the calendar indicating activity that day. You can click on the date with the red dot to see what is scheduled.
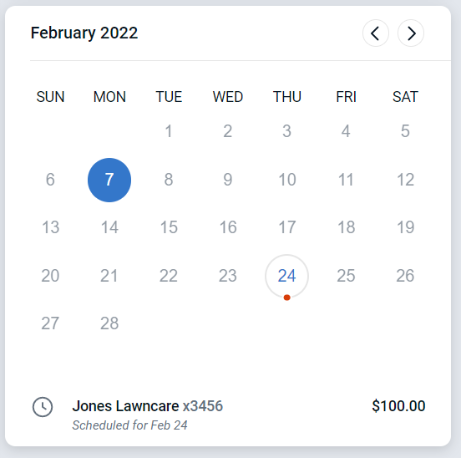
Any payment that has already been paid will indicate that on the History list.

View Payments Paid/Pending - Detailed Method
Click on "Payments" in the sidebar menu.
Then click on "Bill Pay."
Then click "Manage Payments."
Pending and History will be on the right side of the screen.
14. Can I add a comment or memo to my payments?
There are two ways you can add a comment or memo to your payments, the "Quick Method" and the "Detailed Method." Both methods are shown below.
Adding Comments - Quick Method
Click on "Payments" in the sidebar menu.
Then click on "Bill Pay."
Then click "Pay a Bill."
Click on the payee you'd like to schedule a payment for.
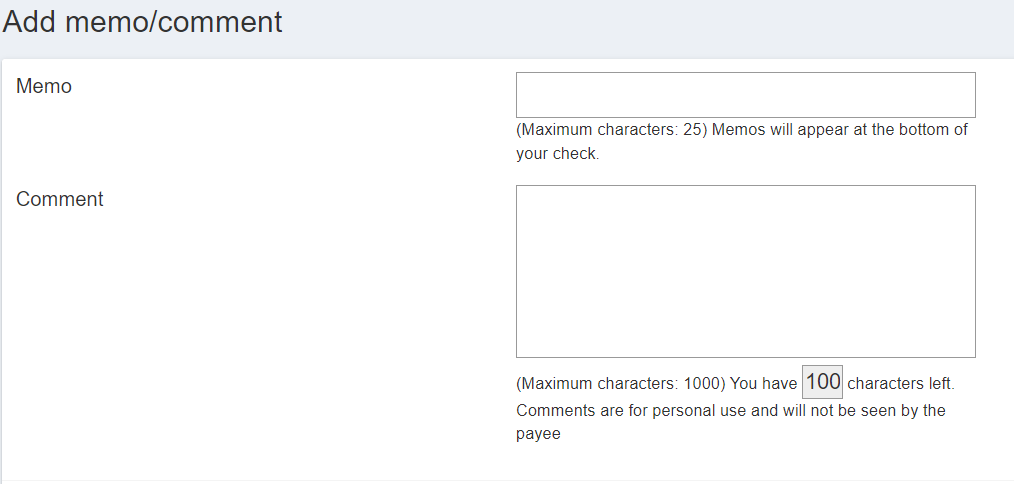
Click "More Options" button to expand the box so you can see "Add memo or comment."

Type in what you'd like your memo or comment to be and click "Save."
You will return to the Payment screen where you can click "Submit" to finalize your payment.
Adding Comments - Detailed Method
Click on "Payments" in the sidebar menu.
Then click on "Bill Pay."
Then click "Manage Payments."
Find the payee you'd like to schedule a payment for on your "Pay to" list.
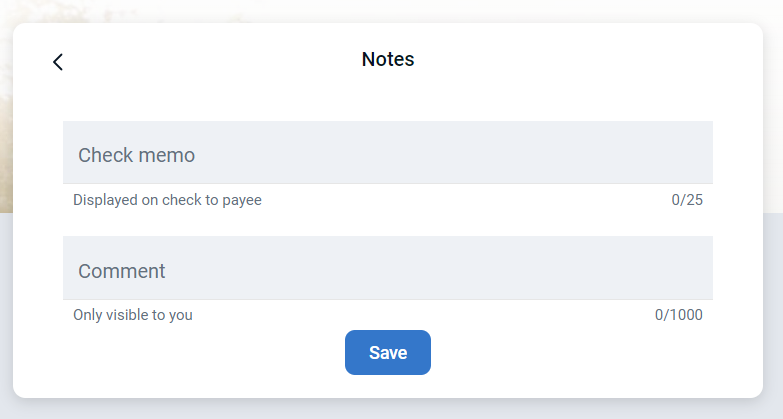
Tap the three dots then click on "Add Memo/comment."
Type your memo or comment in the appropriate box. "Memos" will appear at the bottom of checks and "Comments" are for personal use and will not be seen by the payee.
After typing your memo/comment you can finish scheduling your payment.
15. Can I RUSH payments?
There are two ways you can schedule a RUSH payment, the "Quick Method" and the "Detailed Method." Both methods are shown below.
Rush Payment - Quick Method
Click on "Payments" in the sidebar menu.
Then click on "Bill Pay."
Then click "Pay a bill."
Click on the payee you'd like to schedule a RUSH payment for.
Enter the payment information and then click "More Options."
Click "Arrives by."

You will then see your options. You can send it Standard, Second day, Overnight, or select a later date by clicking Send later. The fee for each option is listed. Click on your preferred option.

The Payment screen will appear again and you will see your option and fee listed under the submit button.
When all of the required fields are completed the "Submit" button will turn dark blue and become clickable. Click "Submit" to finalize your payment.
Rush Payment - Detailed Method
Click on "Payments" in the sidebar menu.
Then click on "Bill Pay."
Then click "Manage Payments."
When scheduling you can click "Rush Delivery" under the "Actions" column.
There are two options for rush delivery. You can send an overnight or second-day payment via electronic or check for a nominal fee. You even have the option to overnight it to a new address if that is what your payee prefers.
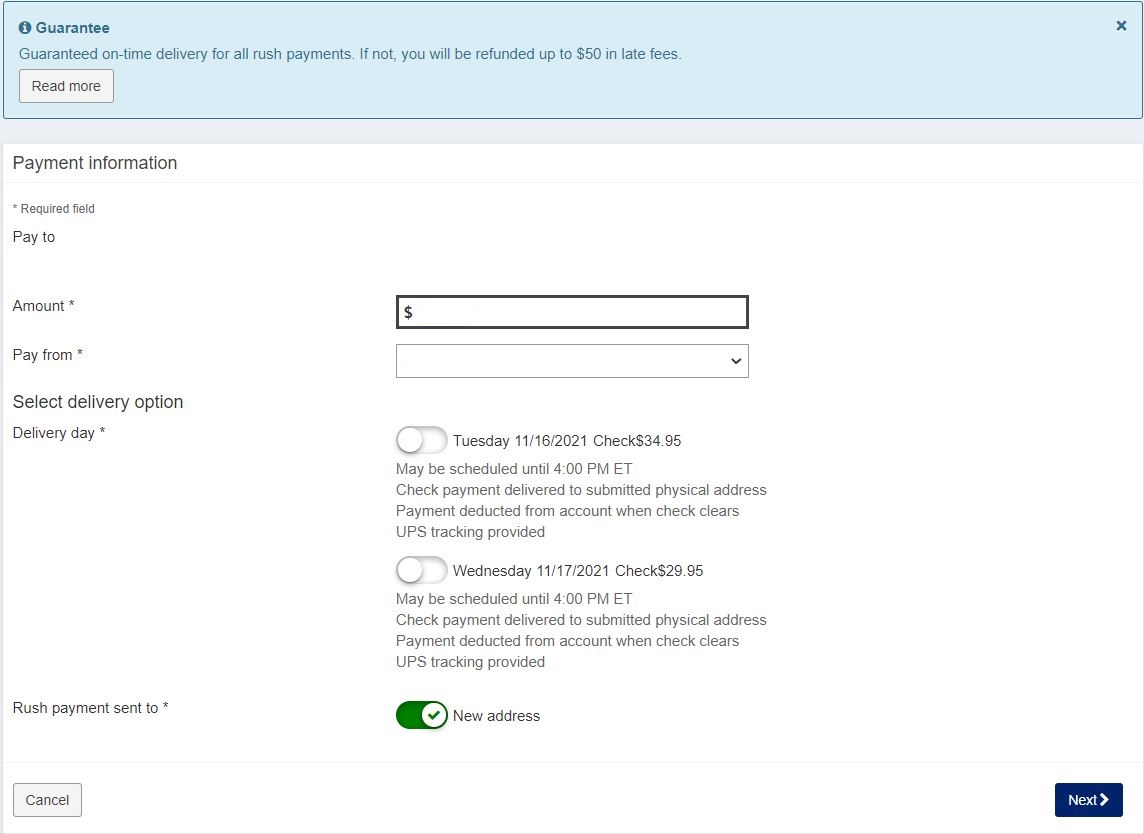
Toggle your preferred option and click Next.
16. Should I use Bill Pay for my TLC Loans?
The easiest and fastest way to pay a TLC loan is to use the transfer button to move funds from a TLC deposit account to a loan account.
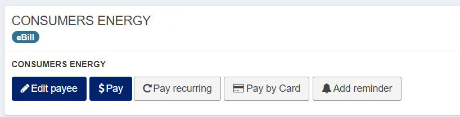
17. What do I need to know about eBills?
Q. What is eBill?
eBill is a feature that allows you to receive and pay electronic versions of paper bills directly from your Online Bill Pay account
Q. How do eBills work?
eBills are delivered directly to your Online Bill Pay account. Once you set up an individual eBill for a company you do business with, an eBill comes directly from that payee to your account. Examples of businesses that offer eBills are cable service providers, phone service providers, utility providers and credit card companies
Q. Will I still receive paper statements?
You may continue to receive paper statements for the next 2 or 3 billing cycles. Contact your payee for more details on their paper statement policy
Q: How will I know if eBill is available?
If a payee offers eBill, there will be a “Setup eBill” link next to their listing on your Online Bill Pay dashboard.
If you are receiving eBill summaries from your payee and full bill statements become available, you will see a button that reads “Setup eBill
Q: What are the primary benefits of eBill?
With eBill, everything you need is in one convenient location. Using eBill allows you to streamline your bill pay routine and have online access to your bills. That means you won't have to keep track of paper bills. In addition, you can view past bill statements at a glance
Q: What information is included in an eBill?
If available for your payee, your full bill statement will be delivered to your account. That means you can view all statement information, including transactions, payment history, credits, and more.
If full eBill details are not available for your payee, you will receive a summary eBill statement that includes balance due, due date and minimum payment amount
Q: How do I pay an eBill?
To pay an eBill, simply choose the account you want to pay from, enter the amount you want to pay and schedule when you want the payment delivered
Q: How do I know when I receive an eBill?
You can sign up to receive an electronic notice to alert you when an eBill has been delivered to your account. You can receive these notices in the form of emails or text alerts to provide an extra reminder when a payment is due.
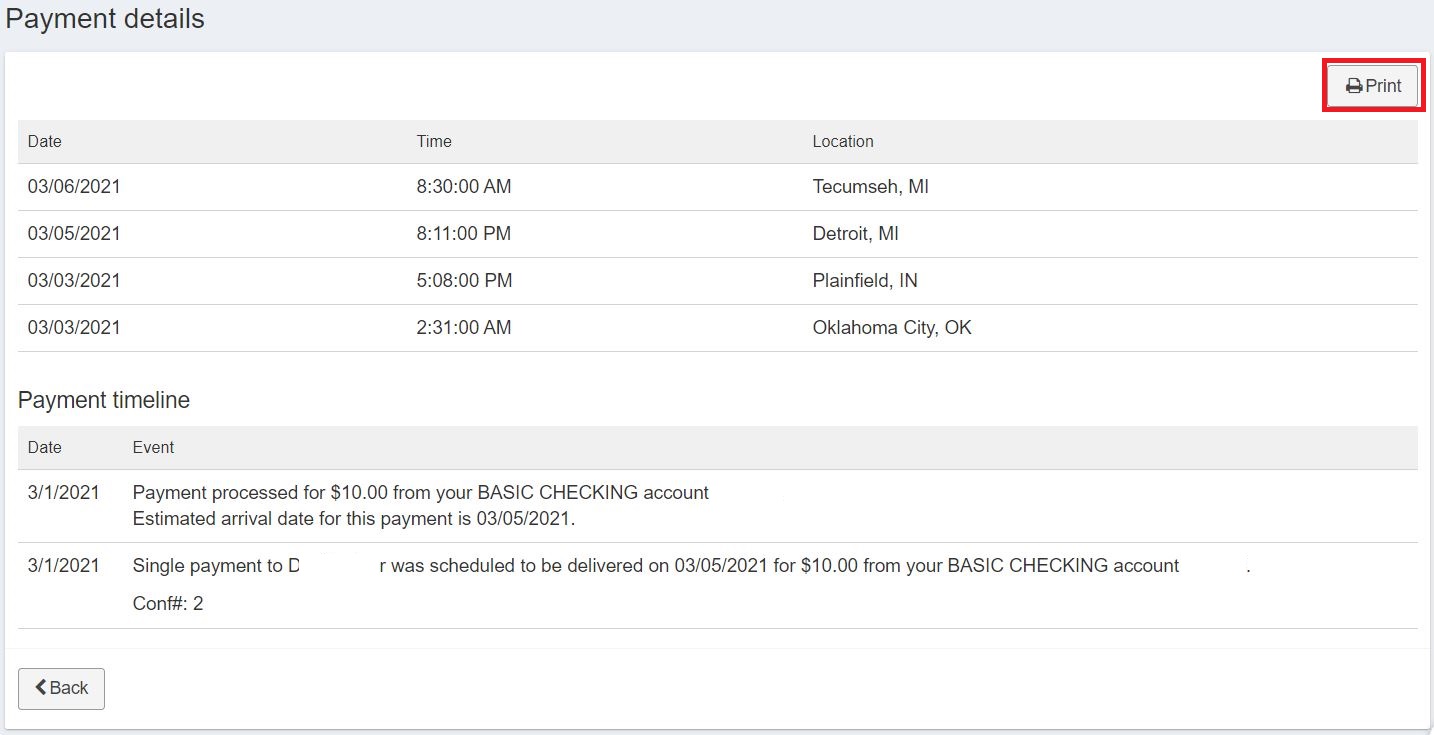
18. How do I print payment details/history?
You can print payment history in Bill Pay through Online Banking (not available through Mobile Banking).
First you will need to go to the "Bill Pay" screen.
Select "Manage Payments"
On the right side of the screen you will see a "History" section. Click on "View" next to the payment you would like see payment details/history for.
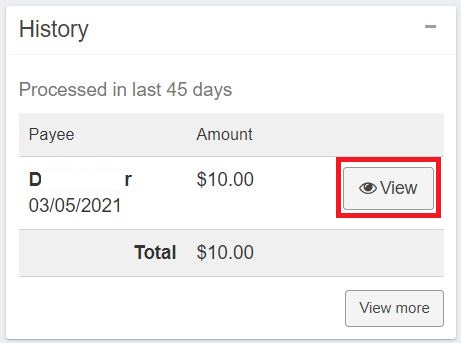
On this screen, you will be able to view the payment details along with the timeline of where the payment is in the delivery process. You can print this screen by using the "Print" button in the top right corner.
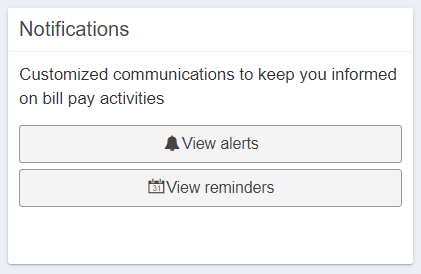
19. How do I setup alerts for Bill Pay?
Bill Pay alerts are very helpful to keep you in informed of all of your bill pay activity. These can be set up only from Online Banking (not available through Mobile Banking).
Click on "Payments" in the sidebar menu.
Then click on "Bill Pay."
Then click "Manage Payments."
Click on "My Account" and then click on "View alerts" under the "Notifications" section.

At the top of the alert page, will be your contact information*. This information is how any bill pay related information will be sent to you.
Click the appropriate box (email, mobile, or click both) next to each Bill Pay Alert you would like to turn on. Click "Update" when you're finished to save your preferences.
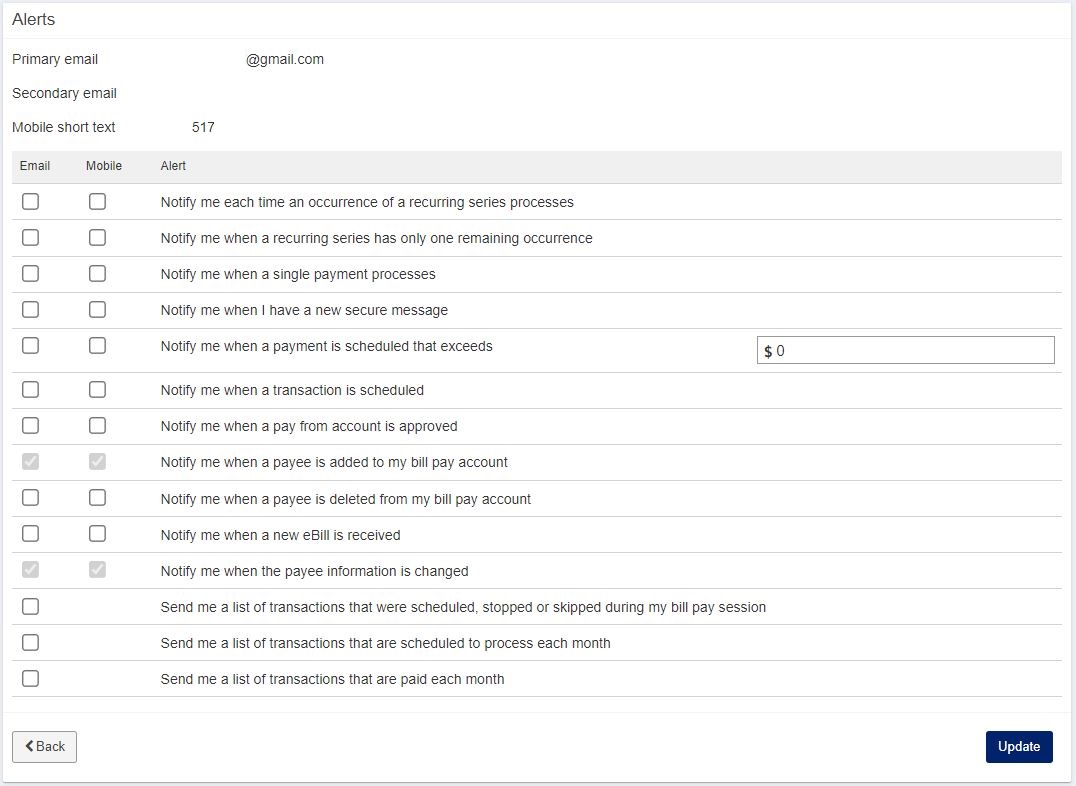
*If your contact information needs corrected, click on your name and profile picture at the bottom left corner of your screen, click settings, and edit your profile information. Visit the Change Address/Phone # FAQ page question 1 for more details.
Tutorial page:
Visit this tutorial page form more information on how to:
- Pay a Bill
- Set up an eBill
- Set Up Payment Reminders
- Set Up Bill Pay Alerts
- Pay by Card
Don't see your question?
We'd love to hear from you!
Zelle® and the Zelle® marks are property of Early Warning Services, LLC and are used herein under license.
Apple and the Apple logo are trademarks of Apple Inc., registered in the U.S. and other countries. Google and Google Play and the logos are a trademark of Google Inc.